How to Screenshot Samsung Galaxy A53
How to take screenshot may still be many who do not know how to use this feature on the Samsung A53 phone. The reason is, Samsung A53 is one of the newcomers so it makes many users still confused about using it.
Samsung Galaxy A53 is a phone with interesting specifications where this one phone will be equipped with several advantages. One of them is in the camera section with 4 cameras on the back with large lenses.
The next interesting side will be found on the chipset that already uses Snapdragon 720G. So in terms of camera and performance, of course there will be no problems with this phone because of its qualified components.
The screenshot feature is of course available on all smartphones, where this feature can be used easily. On Android itself, the operating system has long been equipped with a feature to take screenshots.
Similar to taking screenshots on the Samsung Galaxy M53 5G there are several ways that can be done. Where users can take screenshots with physical buttons, gestures, can even take long screenshots on the Samsung A53.
How to Screenshot Samsung Galaxy A53
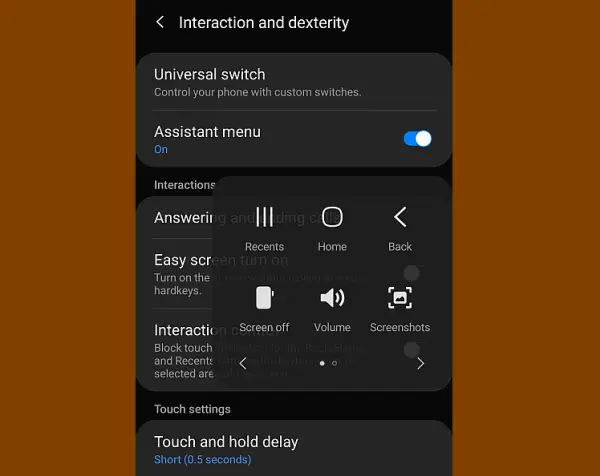
The Galaxy A53 also has a variety of features that can help the work or daily activities of its users. According to Teknodua, one of the interesting features present on this smartphone is an easy screenshot with the help of the Assistant Menu.
This Assistant Menu will float on the smartphone screen and present menus to help users, one of which is a screenshot. But you can also try other alternatives with a combination of physical buttons.
So this is the easiest method to screenshot Samsung A53 without using the help of third-party apps.
Using the Assistant Menu
Here are the steps to take a screenshot on Samsung A53 using the Assistant Menu feature.
- First, open the Settings application or menu on the Samsung Galaxy A53 cellphone.
- On the Settings page, select the Accesibility menu.
- Next, select the Interaction and dexterity menu.
- On the Interaction and dexterity page, activate the Assistant menu.
- Then, the Assistant menu will hover on the Galaxy A53 screen.
- Specify the area to be screenshot.
- Once the area is selected, then open the hovering Assistant menu.
- On the Assistant menu, select Screenshot.
- After the shutter sound is heard and the screen blinks, the screenshot has been taken.
- You can access the screenshot image in the notification menu or Gallery app.
The floating Assistant Menu on the Galaxy A53 screen makes it easy for you to determine the area to be screenshot even if you switch applications or pages. But the disadvantage is, you must first make settings in the menu or Settings application before this feature can be used.
Next, we will do another screenshot method by using a combination of physical buttons.
Physical button combination
- First, determine the area to be screenshot on the Samsung Galaxy A53 cellphone.
- Once the area is determined, press the Power and Volume down buttons simultaneously, and release them immediately.
- When the screen blinks and the shutter sound is heard, the screenshot process has been completed.
- Galaxy A53 will show the screenshot image results in the notification menu and you can access it directly.
- But you can also see the results of the screenshot image in the Gallery application
You could say that this physical button combination is quite practical without the need to make settings first. But keep in mind, you should not use this combination frequently so that the physical button is not quickly damaged.
Using Palm Swipe
The Palm Swipe To Capture feature allows us to take a screenshot of the Samsung A53 by swiping on the screen.
- First, open the Settings menu.
- Next, select Advanced features.
- On the Advanced features page, select the Motions and gestures menu.
- Then, enable Palm swipe to capture.
- Find the area to be screenshot.
- SSwipe from the left to the right of the screen or vice versa with your fingers together until they form like a knife
After this feature is active, then you only need to swipe or swipe on the screen. This feature is arguably unique and has been present on Samsung phones since a few years ago. If you don’t like this method, then you can try using the Assistant Menu.
Long Screenshot Samsung A53
Samsung also equips its phones with a long screenshot feature that allows for screen shots on scrolling pages.
- Open the Settings > Advanced Features.
- After that select the Screenshot and Screen Recorder menu.
- Then activate the Screenshoot Toolbar.
- After the screenshot toolbar is active, then just try to take a screenshot.
- Then the toolbar will appear after the successful screenshot.
- To take a long screenshot, please click the down arrow icon.
If you have another way to screenshot on Samsung Galaxy A53 then you can write it in the comments column below.
