How To Reset Samsung Galaxy A9 Pro (2016)
Restoring your Samsung Galaxy A9 Pro (2016) to its factory state can be a way to solve performance problems, remove malware or get it ready for a new owner. So, today, we will explore how we can perform a factory reset of Samsung Galaxy A9 Pro (2016).
The Samsung Galaxy A9 Pro (2016) boots on Grace UX which is based on Android 6.0 Marshmallow operating system. A 1.8 GHz Octa-Core processor is seated on the Snapdragon 652 MSM8976 chipset ensures quality performance. The processor is further coupled with a 3GB ram so that it can perform well in terms of multitasking. In addition, an Adreno 510 GPU is also present that delivers superb graphical display.
The Samsung Galaxy A9 Pro (2016) flaunts a 6inch Super Amoled display which exhibits a screen resolution of 1080 x 1920 pixels. The device has a pixel density of 367 PPI and carries an aspect ratio of 16:9.
To factory reset phone is often done to fix many issues. Perhaps your Samsung Galaxy A9 Pro (2016) has some problems with performance, for instance, the phone is running slow.
Or your phone is picking up a virus or you only want to remove all your files, programs, passwords and other sensitive information and then throw away the device.
Factory reset Samsung A9 Pro (2016)
Samsung A9 Pro 2016 has provided a reset option via the settings menu. Where you can use this factory reset to clean data, cache, junk files and other files. This feature is useful if you want to sell this phone and also for cleaning internal storage.

Android Marshmallow
- Tap “Apps” on the Home screen.
- In the Apps screen tap “Settings”.
- In the Settings screen, tap ˊBack Up and Resetˋ.
- In the Backup and Reset screen, tap ˊFactory Data Resetˋ.
- In the Factory Data Reset screen, tap ‘Reset Deviceʼ.
- Tap “Delete All”.
- After your device resets, you see the Welcome screen and you can set up your device.
Android Nougat
- Swipe up or down to view the “Apps”.
- Touch “Settings”.
- Scroll to and touch ˊGeneral managementˋ.
- Touch ˊResetˋ.
- Touch ˊFactory data resetˋ.
- Read the warning, then scroll to and touch ‘RESETʼ.
- If you’re prompted for screen lock credentials, enter your PIN/password/pattern and touch ‘NEXTʼ.
- Touch “DELETE ALL”.
- The Samsung Galaxy A9 Pro (2016) will reset and reboot.
Bypass lock Pin / Pattern / Password Samsung A9 Pro (2016)

One of the main reasons why people come to service centers is to bypass pattern locks. You just need to do a hard reset via Google and Samsung Find My Mobile services to bypass the pattern lock, and we’ll show you how to do it.
Unlock Screen with Google Find My Device
- Log into https://www.google.com/android/find with your Google Account ID and password.
- Select the Samsung Galaxy A9 Pro (2016) from the top left hand corner of the menu.
- Choose the “Erase Data” option from the action menu.
- Select ˊErase Deviceˋ to confirm.
- Enter your Google Account password to reset the phone.
Reset Lock Screen use Samsung Find My Mobile
- Log into https://findmymobile.samsung.com with your Samsung Account ID and password.
- Select the Samsung Galaxy A9 Pro (2016) from the menu on the left.
- Choose the “Erase Device” option from below the device information.
- Select the ˊEraseˋ button on the popup.
- Enter your Samsung Account password to confirm and send the task to your phone.
Hard reset Samsung A9 Pro (2016)
Step 1 – Shut down your Samsung Galaxy A9 Pro (2016) completely by pressing the Power button. If your phone is locked and you’re unable to turn it off, you can wait until the battery runs down and attempt the reset of these steps after charging it back up.
Step 2 – Press the Home, Volume Up and the Power button together till the phone displays the start-up logo.
Step 3 – Once the Samsung Galaxy A9 Pro (2016) logo is displayed, release the buttons and wait till the phone enters the Android system recovery mode.
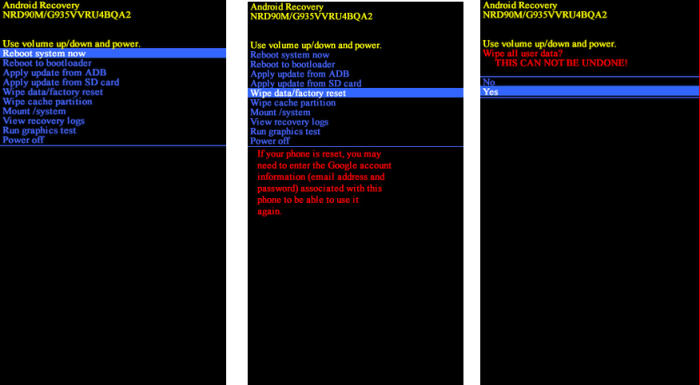
Step 4 – On the displayed screen, use Volume Down button to go to the Wipe data/factory reset option (Volume Up and Volume Down buttons are used to highlight the displayed options on the Android system recovery screen).
Step 5 – Once the option is highlighted, press the Power button to select the option. (Pressing the Power button in Android system recovery mode selects the highlighted option.)
Step 6 – On the next screen, press the Volume Down button multiple times till the Yes — delete all user data option is highlighted.
Step 7 – Press the Power button to hard reset the Samsung Galaxy A9 Pro (2016), which will also clear the dalvik cache.
Conclusion
The Samsung Galaxy A9 Pro (2016) is certainly a device which is pushing the limits in the budget segment. The cameras themselves manage to pull off some pretty shots. The storage is decent and large expandability option is always welcome.
A factory reset is always the last resort and it will be used only when the phone is creating serious issues, want to boost up the performance, planning to sell the phone.